> ## Documentation Index
> Fetch the complete documentation index at: https://www.klavis.ai/docs/llms.txt
> Use this file to discover all available pages before exploring further.
# Setting Up HubSpot OAuth App
> Complete guide to creating and configuring a HubSpot OAuth application
## Prerequisites
* HubSpot developers account
## Step 1: Create HubSpot Developer Account & App
1. Visit [https://developers.hubspot.com/](https://developers.hubspot.com/) and sign in
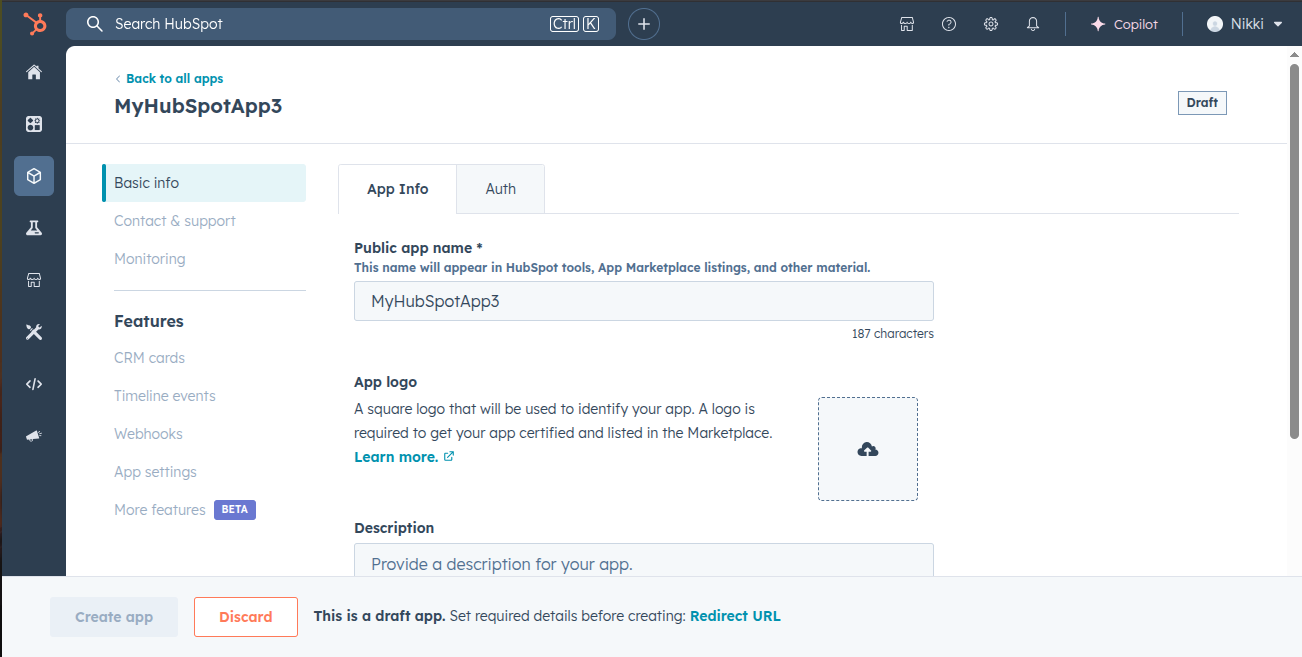
2. Click **"Create App"** and fill out the form:
* **Public app name**: Choose a descriptive name
* **App logo**: Upload 100x100px PNG (recommended)
* **Description**: Associate with your company
 ## Step 2: Configure OAuth Settings
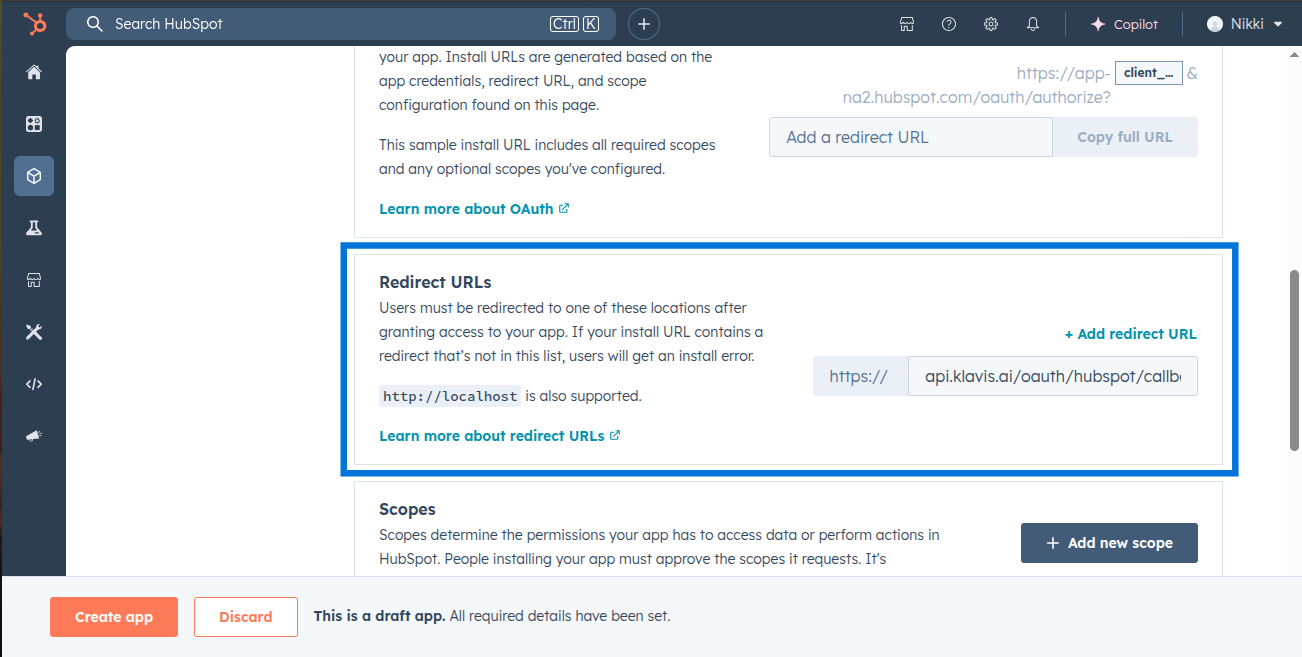
1. Go to the **"Auth"** tab in your application dashboard
2. Add redirect URLs: `https://api.klavis.ai/oauth/hubspot/callback`
Here is an example of Klavis AI OAuth app configuration:
## Step 2: Configure OAuth Settings
1. Go to the **"Auth"** tab in your application dashboard
2. Add redirect URLs: `https://api.klavis.ai/oauth/hubspot/callback`
Here is an example of Klavis AI OAuth app configuration:
 ## Step 3: Request Scopes
Klavis Hubspot MCP Server uses the following OAuth scopes: `account-info.security.read, accounting, cms.domains.read, cms.domains.write, crm.export, crm.import, crm.lists.read, crm.lists.write, crm.objects.companies.read, crm.objects.companies.write, crm.objects.contacts.read, crm.objects.contacts.write, crm.objects.deals.read, crm.objects.deals.write, crm.objects.marketing_events.read, crm.objects.marketing_events.write, crm.objects.owners.read, crm.objects.quotes.read, crm.objects.quotes.write, crm.schemas.companies.read, crm.schemas.companies.write, crm.schemas.contacts.read, crm.schemas.contacts.write, oauth, settings.users.read, settings.users.write, tickets, timeline, e-commerce, crm.objects.custom.read, crm.schemas.custom.read, content, sales-email-read`
1. Go to the **"Auth"** tab in your application dashboard
2. Scroll down to **"Scopes"**.
3. Click **"Add New Scope"** and add required scopes.
Here is an example of Klavis AI OAuth app configuration:
## Step 3: Request Scopes
Klavis Hubspot MCP Server uses the following OAuth scopes: `account-info.security.read, accounting, cms.domains.read, cms.domains.write, crm.export, crm.import, crm.lists.read, crm.lists.write, crm.objects.companies.read, crm.objects.companies.write, crm.objects.contacts.read, crm.objects.contacts.write, crm.objects.deals.read, crm.objects.deals.write, crm.objects.marketing_events.read, crm.objects.marketing_events.write, crm.objects.owners.read, crm.objects.quotes.read, crm.objects.quotes.write, crm.schemas.companies.read, crm.schemas.companies.write, crm.schemas.contacts.read, crm.schemas.contacts.write, oauth, settings.users.read, settings.users.write, tickets, timeline, e-commerce, crm.objects.custom.read, crm.schemas.custom.read, content, sales-email-read`
1. Go to the **"Auth"** tab in your application dashboard
2. Scroll down to **"Scopes"**.
3. Click **"Add New Scope"** and add required scopes.
Here is an example of Klavis AI OAuth app configuration:
 ## Step 4: Create App
1. Now Click the **"Create App"** Button
You have successfully created a HubSpot OAuth application! You now have your Client ID and Client Secret ready for integration with Klavis AI.
## (Optional) Step 5: White Labeling
White labeling allows you to customize the OAuth experience with your own branding instead of Klavis AI's.
If you want to use your own HubSpot OAuth application with custom branding:
1. **Configure White Labeling**: Go to [https://www.klavis.ai/home/white-label](https://www.klavis.ai/home/white-label)
2. **Add Your Credentials**: Enter your HubSpot **Client ID** and **Client Secret**
3. **Set Redirect URI**: Use `https://api.klavis.ai/oauth/hubspot/callback` or your custom callback URL
4. **Initiate OAuth**: Use your client ID when starting the OAuth flow:
```javascript without SDK theme={null}
// Example: Initiating HubSpot OAuth with white-label
const authUrl = `https://api.klavis.ai/oauth/hubspot/authorize?instance_id=${instanceId}&client_id=${yourClientId}`;
window.location.href = authUrl;
```
```typescript TypeScript SDK theme={null}
import { Klavis } from "@klavis/sdk";
const klavis = new Klavis({
apiKey: "YOUR_API_KEY"
});
// Example: Initiating HubSpot OAuth with white-label
const oauthUrl = await klavis.mcpServer.getOAuthUrl({
serverName: Klavis.McpServerName.Hubspot,
instanceId: instanceId,
clientId: yourClientId,
// redirectUri: YOUR_REDIRECT_URI,
// scope: "YOUR_SCOPES",
});
window.location.href = oauthUrl;
```
```python Python SDK theme={null}
import webbrowser
from klavis import Klavis
from klavis.types import McpServerName
klavis = Klavis(api_key="YOUR_API_KEY")
# Example: Initiating HubSpot OAuth with white-label
oauth_url = klavis.mcp_server.get_oauth_url(
server_name=McpServerName.HUBSPOT,
instance_id=instance_id,
client_id=your_client_id,
# redirect_uri="YOUR_REDIRECT_URI",
# scope="YOUR_SCOPES"
)
# Open OAuth URL in user's default browser
webbrowser.open(oauth_url)
```
For detailed white labeling implementation and code examples, see our [OAuth & White Labeling guide](/docs/auth/white-label).
## Resources
* [HubSpot OAuth Documentation](https://developers.hubspot.com/docs/guides/apps/authentication/working-with-oauth)
* [Klavis OAuth & White Labeling Guide](/docs/auth/white-label)
* [Klavis White Label Dashboard](https://www.klavis.ai/home/white-label)
## Step 4: Create App
1. Now Click the **"Create App"** Button
You have successfully created a HubSpot OAuth application! You now have your Client ID and Client Secret ready for integration with Klavis AI.
## (Optional) Step 5: White Labeling
White labeling allows you to customize the OAuth experience with your own branding instead of Klavis AI's.
If you want to use your own HubSpot OAuth application with custom branding:
1. **Configure White Labeling**: Go to [https://www.klavis.ai/home/white-label](https://www.klavis.ai/home/white-label)
2. **Add Your Credentials**: Enter your HubSpot **Client ID** and **Client Secret**
3. **Set Redirect URI**: Use `https://api.klavis.ai/oauth/hubspot/callback` or your custom callback URL
4. **Initiate OAuth**: Use your client ID when starting the OAuth flow:
```javascript without SDK theme={null}
// Example: Initiating HubSpot OAuth with white-label
const authUrl = `https://api.klavis.ai/oauth/hubspot/authorize?instance_id=${instanceId}&client_id=${yourClientId}`;
window.location.href = authUrl;
```
```typescript TypeScript SDK theme={null}
import { Klavis } from "@klavis/sdk";
const klavis = new Klavis({
apiKey: "YOUR_API_KEY"
});
// Example: Initiating HubSpot OAuth with white-label
const oauthUrl = await klavis.mcpServer.getOAuthUrl({
serverName: Klavis.McpServerName.Hubspot,
instanceId: instanceId,
clientId: yourClientId,
// redirectUri: YOUR_REDIRECT_URI,
// scope: "YOUR_SCOPES",
});
window.location.href = oauthUrl;
```
```python Python SDK theme={null}
import webbrowser
from klavis import Klavis
from klavis.types import McpServerName
klavis = Klavis(api_key="YOUR_API_KEY")
# Example: Initiating HubSpot OAuth with white-label
oauth_url = klavis.mcp_server.get_oauth_url(
server_name=McpServerName.HUBSPOT,
instance_id=instance_id,
client_id=your_client_id,
# redirect_uri="YOUR_REDIRECT_URI",
# scope="YOUR_SCOPES"
)
# Open OAuth URL in user's default browser
webbrowser.open(oauth_url)
```
For detailed white labeling implementation and code examples, see our [OAuth & White Labeling guide](/docs/auth/white-label).
## Resources
* [HubSpot OAuth Documentation](https://developers.hubspot.com/docs/guides/apps/authentication/working-with-oauth)
* [Klavis OAuth & White Labeling Guide](/docs/auth/white-label)
* [Klavis White Label Dashboard](https://www.klavis.ai/home/white-label)