> ## Documentation Index
> Fetch the complete documentation index at: https://www.klavis.ai/docs/llms.txt
> Use this file to discover all available pages before exploring further.
# Setting Up Salesforce OAuth App
> Complete guide to creating and configuring a Salesforce OAuth application
## Prerequisites
* Salesforce account (personal or business)
* Access to Salesforce Developer Portal
## Step 1: Create Salesforce Developer Account
1. Visit [https://developer.salesforce.com/](https://developer.salesforce.com/)
2. Click **"Sign Up"** or **"Login"** if you already have an account
3. Sign in with your Salesforce account or create a new developer account
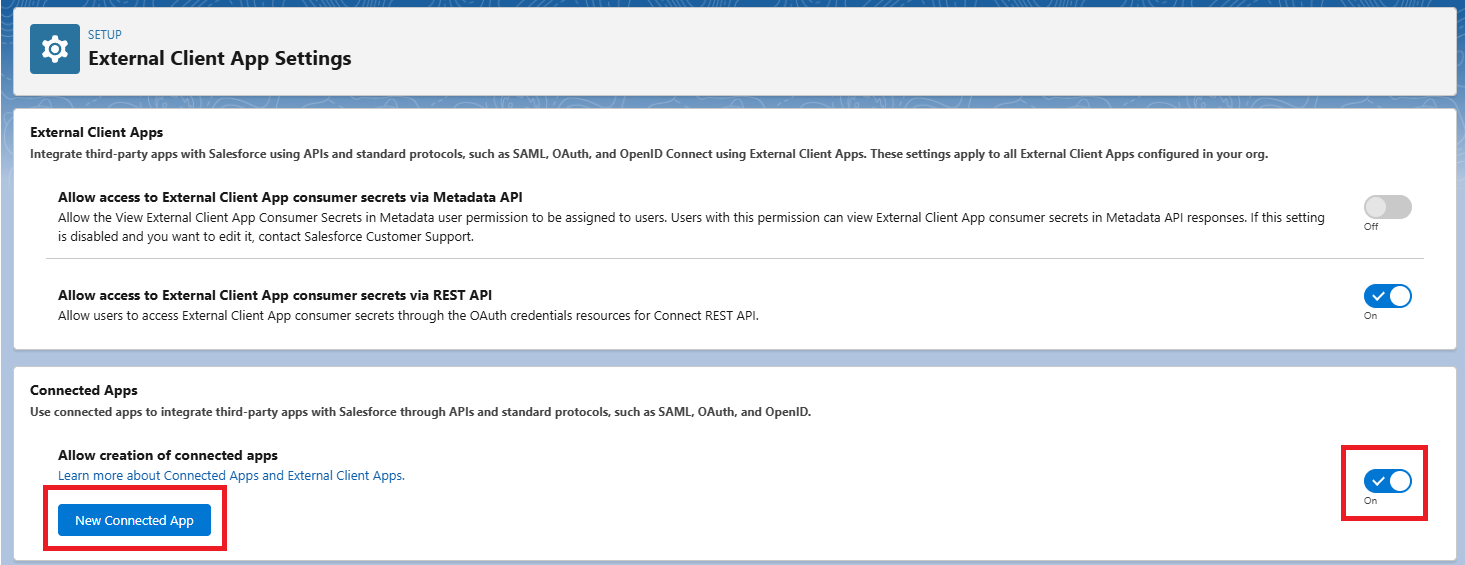
 ## Step 2: Enable Connected Apps
1. Once logged in, go to **"Setup Menu"** (Gear Icon) and click **"Setup"**
2. Search **"External Client Apps"** in the **"Quick Find"** search box
3. In **"External Client App Settings"**, enable **"Allow creation of connected apps"**
4. Click **"New Connected App"**
## Step 2: Enable Connected Apps
1. Once logged in, go to **"Setup Menu"** (Gear Icon) and click **"Setup"**
2. Search **"External Client Apps"** in the **"Quick Find"** search box
3. In **"External Client App Settings"**, enable **"Allow creation of connected apps"**
4. Click **"New Connected App"**
 ## Step 3: Fill Basic App Information
1. Fill the necessary app details:
* **Connected App Name**: Your application name (e.g., your brand name)
* **API Name**: Auto-generated from app name (only letters, numbers, and underscores allowed)
* **Contact Email**: Your contact email for Salesforce support
* **Contact Phone**: Your contact phone for Salesforce support
* **Logo Image URL**: (Optional) HTTPS URL for your app logo (max 100 KB, preferably under 20 KB)
* **Info URL**: (Optional) Web page with more information about your app
* **Description**: (Optional) Up to 256 characters describing your app
## Step 3: Fill Basic App Information
1. Fill the necessary app details:
* **Connected App Name**: Your application name (e.g., your brand name)
* **API Name**: Auto-generated from app name (only letters, numbers, and underscores allowed)
* **Contact Email**: Your contact email for Salesforce support
* **Contact Phone**: Your contact phone for Salesforce support
* **Logo Image URL**: (Optional) HTTPS URL for your app logo (max 100 KB, preferably under 20 KB)
* **Info URL**: (Optional) Web page with more information about your app
* **Description**: (Optional) Up to 256 characters describing your app
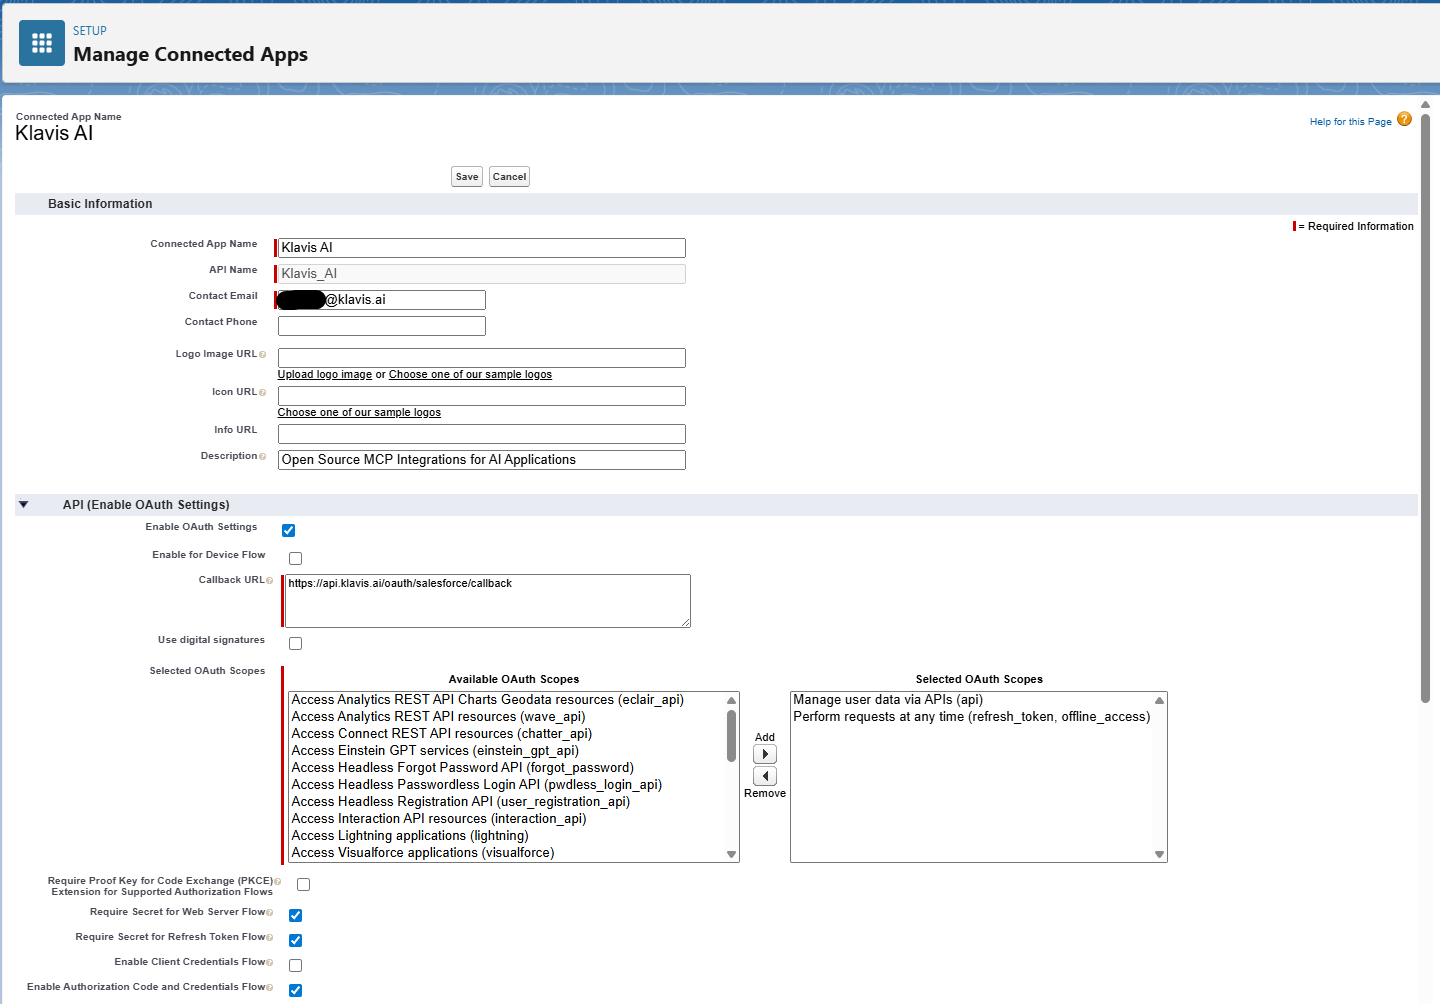 Klavis Salesforce MCP Server uses the following OAuth scopes: `api,refresh_token,offline_access`
1. In the **API (Enable OAuth Settings)** section:
* Select **"Enable OAuth Settings"**
* **Callback URL**: Enter `https://api.klavis.ai/oauth/salesforce/callback`
2. **Select OAuth Scopes**: Move required scopes from **"Available OAuth Scopes"** to **"Selected OAuth Scopes"**:
* `Manage User Data via APIs (api)` - required to manage user data via APIs
* `Perform requests on your behalf at any time (refresh_token, offline_access)` - required to perform requests at any time
3. **Additional Settings**:
* Enable **"Require Secret for Web Server Flow"** if your app can keep the client secret confidential
* Enable **"Require Secret for Refresh Token Flow"**
* Enable **"Enable Authorization Code and Credentials Flow"**
* Disable **"Require PKCE Extension for Supported Authorization Flows"**
4. Click **"Save"** to create the app
## Step 4: Get Consumer Key and Secret
After creating the app, follow these steps to get the credentials.
1. From dashboard, go to **"Setup Menu"** (Gear Icon) and click **"Setup"**
2. Search **"App Manager"** in the **"Quick Find"** search box
3. Find your connected app in the list and click the dropdown arrow, then select **"View"**
Klavis Salesforce MCP Server uses the following OAuth scopes: `api,refresh_token,offline_access`
1. In the **API (Enable OAuth Settings)** section:
* Select **"Enable OAuth Settings"**
* **Callback URL**: Enter `https://api.klavis.ai/oauth/salesforce/callback`
2. **Select OAuth Scopes**: Move required scopes from **"Available OAuth Scopes"** to **"Selected OAuth Scopes"**:
* `Manage User Data via APIs (api)` - required to manage user data via APIs
* `Perform requests on your behalf at any time (refresh_token, offline_access)` - required to perform requests at any time
3. **Additional Settings**:
* Enable **"Require Secret for Web Server Flow"** if your app can keep the client secret confidential
* Enable **"Require Secret for Refresh Token Flow"**
* Enable **"Enable Authorization Code and Credentials Flow"**
* Disable **"Require PKCE Extension for Supported Authorization Flows"**
4. Click **"Save"** to create the app
## Step 4: Get Consumer Key and Secret
After creating the app, follow these steps to get the credentials.
1. From dashboard, go to **"Setup Menu"** (Gear Icon) and click **"Setup"**
2. Search **"App Manager"** in the **"Quick Find"** search box
3. Find your connected app in the list and click the dropdown arrow, then select **"View"**
 4. In the **API (Enable OAuth Settings)** section, click **"Manage Consumer Details"**
5. Verify your identity using the **verification code** sent to your email
6. Copy the **Consumer Key** and **Consumer Secret** (keep them secure!)
4. In the **API (Enable OAuth Settings)** section, click **"Manage Consumer Details"**
5. Verify your identity using the **verification code** sent to your email
6. Copy the **Consumer Key** and **Consumer Secret** (keep them secure!)
 ## (Optional) Step 5: White Labeling
White labeling allows you to customize the OAuth experience with your own branding instead of Klavis AI's.
If you want to use your own Salesforce OAuth application with custom branding:
1. **Configure White Labeling**: Go to [https://www.klavis.ai/home/white-label](https://www.klavis.ai/home/white-label)
2. **Add Your Credentials**: Enter your Salesforce **Consumer Key** and **Consumer Secret** from Step 5
3. **Set Redirect URI**: Use `https://api.klavis.ai/oauth/salesforce/callback` or your custom callback URL
4. **Initiate OAuth**: Use your Client Id when starting the OAuth flow:
```javascript without SDK theme={null}
// Example: Initiating Salesforce OAuth with white-label
const authUrl = `https://api.klavis.ai/oauth/salesforce/authorize?instance_id=${instanceId}&client_id=${yourClientId}`;
window.location.href = authUrl;
```
```typescript TypeScript SDK theme={null}
import { Klavis } from "@klavis/sdk";
const klavis = new Klavis({
apiKey: "YOUR_API_KEY"
});
// Example: Initiating Salesforce OAuth with white-label
const oauthUrl = await klavis.mcpServer.getOAuthUrl({
serverName: Klavis.McpServerName.Salesforce,
instanceId: instanceId,
clientId: yourClientId,
// redirectUri: YOUR_REDIRECT_URI,
// scope: "YOUR_SCOPES",
});
window.location.href = oauthUrl;
```
```python Python SDK theme={null}
import webbrowser
from klavis import Klavis
from klavis.types import McpServerName
klavis = Klavis(api_key="YOUR_API_KEY")
# Example: Initiating Salesforce OAuth with white-label
oauth_url = klavis.mcp_server.get_oauth_url(
server_name=McpServerName.SALESFORCE,
instance_id=instance_id,
client_id=your_client_id,
# redirect_uri="YOUR_REDIRECT_URI",
# scope="YOUR_SCOPES"
)
# Open OAuth URL in user's default browser
webbrowser.open(oauth_url)
```
For detailed white labeling implementation and code examples, see our [OAuth & White Labeling guide](/docs/auth/white-label).
## Resources
* [Salesforce Developer Documentation](https://developer.salesforce.com/docs)
* [Salesforce OAuth Authentication Guide](https://developer.salesforce.com/docs/atlas.en-us.api_streaming.meta/api_streaming/code_sample_auth_oauth.htm)
* [Klavis OAuth & White Labeling Guide](/docs/auth/white-label)
* [Klavis White Label Dashboard](https://www.klavis.ai/home/white-label)
* [Salesforce API Scopes Reference](https://developer.salesforce.com/docs/platform/mobile-sdk/guide/oauth-scope-parameter-values.html)
## (Optional) Step 5: White Labeling
White labeling allows you to customize the OAuth experience with your own branding instead of Klavis AI's.
If you want to use your own Salesforce OAuth application with custom branding:
1. **Configure White Labeling**: Go to [https://www.klavis.ai/home/white-label](https://www.klavis.ai/home/white-label)
2. **Add Your Credentials**: Enter your Salesforce **Consumer Key** and **Consumer Secret** from Step 5
3. **Set Redirect URI**: Use `https://api.klavis.ai/oauth/salesforce/callback` or your custom callback URL
4. **Initiate OAuth**: Use your Client Id when starting the OAuth flow:
```javascript without SDK theme={null}
// Example: Initiating Salesforce OAuth with white-label
const authUrl = `https://api.klavis.ai/oauth/salesforce/authorize?instance_id=${instanceId}&client_id=${yourClientId}`;
window.location.href = authUrl;
```
```typescript TypeScript SDK theme={null}
import { Klavis } from "@klavis/sdk";
const klavis = new Klavis({
apiKey: "YOUR_API_KEY"
});
// Example: Initiating Salesforce OAuth with white-label
const oauthUrl = await klavis.mcpServer.getOAuthUrl({
serverName: Klavis.McpServerName.Salesforce,
instanceId: instanceId,
clientId: yourClientId,
// redirectUri: YOUR_REDIRECT_URI,
// scope: "YOUR_SCOPES",
});
window.location.href = oauthUrl;
```
```python Python SDK theme={null}
import webbrowser
from klavis import Klavis
from klavis.types import McpServerName
klavis = Klavis(api_key="YOUR_API_KEY")
# Example: Initiating Salesforce OAuth with white-label
oauth_url = klavis.mcp_server.get_oauth_url(
server_name=McpServerName.SALESFORCE,
instance_id=instance_id,
client_id=your_client_id,
# redirect_uri="YOUR_REDIRECT_URI",
# scope="YOUR_SCOPES"
)
# Open OAuth URL in user's default browser
webbrowser.open(oauth_url)
```
For detailed white labeling implementation and code examples, see our [OAuth & White Labeling guide](/docs/auth/white-label).
## Resources
* [Salesforce Developer Documentation](https://developer.salesforce.com/docs)
* [Salesforce OAuth Authentication Guide](https://developer.salesforce.com/docs/atlas.en-us.api_streaming.meta/api_streaming/code_sample_auth_oauth.htm)
* [Klavis OAuth & White Labeling Guide](/docs/auth/white-label)
* [Klavis White Label Dashboard](https://www.klavis.ai/home/white-label)
* [Salesforce API Scopes Reference](https://developer.salesforce.com/docs/platform/mobile-sdk/guide/oauth-scope-parameter-values.html)